
Happy Valentine’s Day! Since I had so much fun making a mirror glaze cake a couple of weeks ago, I decided to make one again this weekend. I went with a chocolate-hazelnut flavour profile this time. I am so happy with how both the mirror glaze and the cake flavour turned out.
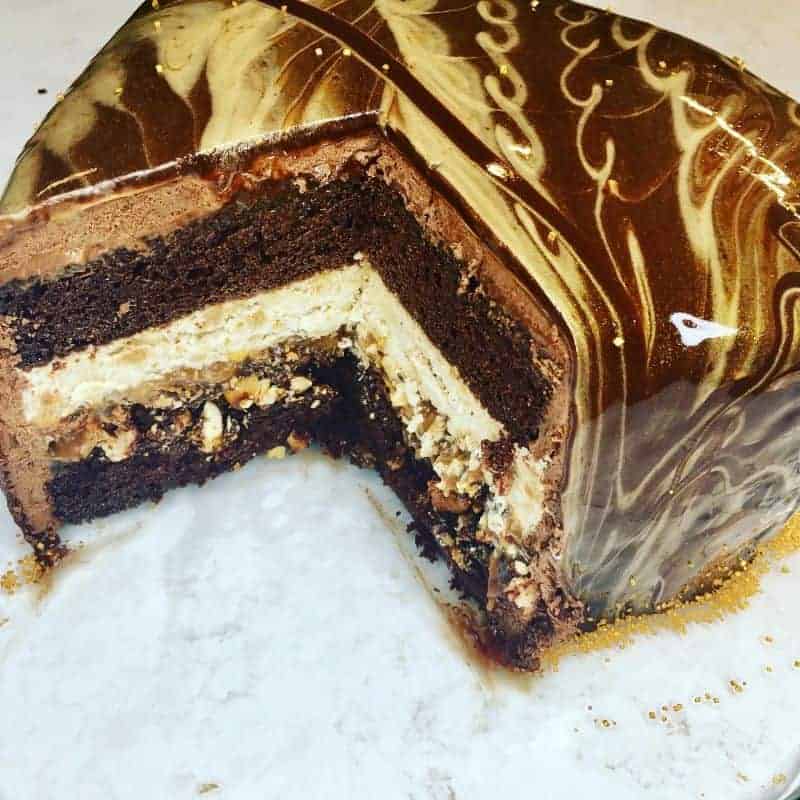
I took inspiration from the Cherry Almond Mousse Cake I made a couple of weeks ago and structured the cake in the similar manner. I made two layers of chocolate cake that I added a bit of hazelnut bakery emulsion to. I also did a chocolate-hazelnut crunch layer, some hazelnut mousse and some dark chocolate mousse. For extra flavour, I added a layer of salted caramel.
I wanted to do a two-toned mirror glaze that spoke to what was inside of the cake so I thought dark chocolate and a gold colour would work well. I figured I could do a portion of the glaze white chocolate mixed with gold colour and a portion with dark chocolate. I looked around online to see if I could find any recipe examples, but couldn’t find anything! I decided to see if I could just portion out the Glaze Recipe that I used last time by weight and do 2/3 dark chocolate and 1/3 white. I wasn’t sure if it would work well, or if the dark chocolate glaze would overwhelm the white chocolate one, but it was worth a shot.
I was so pleasantly surprised when I poured the glaze! I used gold lustre dust to colour the white chocolate glaze. When I mixed the two together, there was lots of the gold colour present and it also mixed a bit with the dark chocolate, giving the whole cake an overall shimmery look. It was so pretty! The pattern that emerged after pouring the glaze made it look a bit like a tiger stone. After I moved it to my cake plate, I finished off the bottom edge with some gold sprinkles and sprinkled a few over the top to catch more light.
Then came the taste test … it sounds like bragging, but I would have been happy to pay for a slice of this in a restaurant. This was honestly the best cake I have ever made! Overall it wasn’t to sweet because of all the dark chocolate. The layer of salted caramel balanced it out really well and the crunch layer gave it a pleasing texture. The only complaint I had was that there was a bit too much of the chocolate cake, making the pieces huge! So I have reduced the cake batter amount in the recipe.
I posted a picture of the cake to Reddit this morning and my phone has been beeping with notifications all morning! As of this post, I have 7,200 upvotes and my cake is on the front page of Reddit! Feeling a bit overwhelmed at my 15 minutes of fame!
Ingredients
-
For the Cake
- For the Hazelnut Praline paste and Crunch Layer
- For the Hazelnut Mousse
- For the Salted Caramel
- For the Dark Chocolate Mousse
- For Assembly
- For the Mirror Glaze
- To Finish
Instructions
-
For the Cake
- Preheat oven to 350F/180 C. Grease, flour and line with parchment paper two 10-inch heart-shaped pans or two 9-inch round pans.
- Combine chocolate, cocoa, espresso powder and hot water in a medium heatproof bowl or double boiler, set over an inch of barely simmering water. Stir constantly with a rubber spatula until chocolate is melted, 1-2 minutes. Then add 2 tbsp (25 g) granulated sugar and cook, stirring until thick and glossy, 1-2 minutes. Remove from heat and set aside to cool.
- Whisk flour, baking soda and salt together in a medium bowl. Set aside.
- Combine buttermilk, hazelnut emulsion and vanilla in a small bowl. Set aside.
- Using a stand mixer with the whisk attachment, whip egg and egg yolk on medium speed until combined. Add brown sugar and remaining granulated sugar. Increase speed to high and whip until doubled in volume, about 2-3 minutes.
- Change from the whisk to the paddle attachment and add cooled chocolate mixture. Mix on medium speed until fully combined, 30 – 45 seconds. Scrape down the bowl.
- Add butter, one piece at a time, mixing 10 seconds after each addition.
- Add flour in 3 additions, alternating with milk in 2 additions, mixing to incorporate between each addition.
- Remove bowl from mixer and give a final stir by hand, making sure to incorporate anything from the bottom of the bowl that didn’t get mixed in.
- Divide batter between prepared pans and smooth tops with a rubber spatula.
- Bake until a toothpick inserted in the centre comes out clean, 15-20 minutes.
- Let cakes cool in pans on a rack for 10 minutes then remove from pans, discard parchment paper and cool completely on racks, about 2 hours. For the Hazelnut Praline Paste
- Heat sugar with 4 tbsp water over medium heat until it reaches a golden caramel colour. Do not stir the mixture or it may crystalize. You can shake the pan every so often to combine.
- Pour in the toasted hazelnuts and mix with a greased heat-proof spatula.
- Turn out onto a foil or silicone lined baking sheet and smooth to an even layer. Allow the praline to cool and harden.
- Break off 2/3 of the praline and process to a paste in the food processor with hazelnut emulsion. Set aside 150 g for the paste to add to the hazelnut mousse. Put the rest into a bowl for the hazelnut crunch.
- Roughly chop the rest of the praline and add to the paste that has been set aside for the crunch along with the waffle cone pieces. (the chocolate will be added just before the cake assembly.) For the Salted Caramel
- Whisk together sugar, water and 3/4 tsp salt in the medium saucepan.
- Cook over medium-high heat until the mixture turns an amber caramel color, gently shaking the pan every so often. DO NOT STIR or your caramel may crystallize!
- Remove the pan from heat and whisk in butter and cream. Be careful, as liquid may bubble up.
- Transfer caramel sauce to a bowl and chill in the fridge until ready to use. If the mixture hardens, you can soften it in the microwave by reheating for 20-30 seconds. For the Hazelnut Mousse
- Combine gelatin and 4 tbsp water in a small bowl. Let sit for 5 minutes.
- In a heat-proof bowl, combine egg yolks, 2 tbsp water, corn syrup, and hazelnut liqueureur.
- Beat over a pot of simmering water until the mixture is thick and forms ribbons. The temperature of the eggs should reach 160F. Remove from heat.
- Microwave the gelatin for 20-30 seconds until melted. Add to the egg mixture. Beat the mixture until it is cool.
- Stir in the reserved praline paste
- In a separate bowl, whip the cream, sugar, hazelnut emulsion and vanilla to stiff peaks. Gently fold into the egg mixture and set aside. To Begin Assembly
- Line one of your pans with plastic wrap that goes over the edges of the pan. Lay one cake layer inside the pan. If you have acetate to make a collar, tuck it around the perimeter of the cake, between the cake and the pan. This will help to make your layers more even on the sides.
- Brush the cake with 1/2 tbsp hazelnut liqueur.
- Complete the praline crunch by melting the chocolate and adding reserved chopped hazelnuts, hazelnut paste and waffle cones. Spread over the cake. Freeze for 15 minutes to solidify the chocolate.
- Soften the caramel in the microwave, if needed then spread over the hazelnut crunch layer. Sprinkle with 1/4 tsp sea salt. Freeze 30 minutes.
- Spread the hazelnut mousse over the caramel layer. Brush the 2nd cake layer with 1/2 tsp hazelnut liqueur then place over top of the hazelnut mousse. Freeze the cake for 2 hours until the mouse has solidified. For the Dark Chocolate Mousse
- 30 minutes before removing the cake from the freezer, Pour 150ml (2/3 cup) of the double cream into a small pan and bring to just below boiling point. Pour over the chopped chocolate and stir to a smooth ganache. Stir in a pinch of salt. Leave to cool to lukewarm.
- Meanwhile, whisk the remaining 250ml (1 cup) of cream and vanilla to soft peaks and fold into the cooled ganache, one third at a time. Put in the fridge for 20 minutes to firm up a bit.
- Turn the cake out onto a cake board that is about 1 cm larger than the cake. Spread the chocolate mousse over the top and sides of the cake in an even layer. Chill in the freezer until completely frozen. I recommend overnight. Once the cake is frozen, use a butter knife to smooth out any bumps in the mousse so that they don't show through the glaze. For the Mirror Glaze
- In a small bowl, mix together gelatin and 80 g water. Let sit for 5 minutes.
- In a medium saucepan, bring sugar, corn syrup and 100 g water to a simmer. Stir frequently until sugar is dissolved.
- Add bloomed gelatine and sweetened condensed milk.
- Place the two chopped chocolates in two separate bowls. Pour 490 g of the condensed milk mixture over the dark chocolate and 240 g over the white chocolate. Let sit for 5 minutes. Blend mixture with a whisk or immersion blender
- Strain each mixture into separate containers to get rid of any bubbles
- Stir the gold powder into the white chocolate mixture.
- Let cool to 32-35 C (90-95 F). Pour the white chocolate mixture into the dark chocolate mixture. Give a gentle stir to mix the colours slightly.
- Place your frozen cake on top of an overturned bowl or baking pan that is smaller than the cake, set in a rimmed baking sheet to catch the glaze that drips off. Pour glaze over top of cake starting from the center and then going over the top in any pattern you would like. Let set for 15-20 minutes.
- Use a knife to cut drips off the bottom of the cake then move to a cake plate. Press gold sprinkles into the bottom edge for a more clean edge, if you wish.